I made this card using One for the boys CD I was able to print out the car several times to decoupage it
Sunday, 9 November 2008
Christmas Parcels
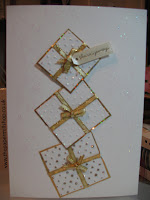
I used an embsooing folder then cut out the squre parcels mounted them onto gold wrapping paper added ribbon and mounted them onto the card I added the greeting as parcel tag then added a little glitter glue
Saturday, 8 November 2008
Christmas Holly
Friday, 7 November 2008
Black Christams Cards
Wednesday, 5 November 2008
Tutorial Designing your footy top on PC
Instructions in designing your footy top
I use publisher choose a blank page then go to the rectangle tool shape drag and draw the shape onto your page it needs to be approx 14 cms x 8cms use your ruler guides for this,
you can choose you favorite team colour if you want stripes use the rectangle shape and drag to the size you want, colour it and copy and paste as many as you need
place them onto the shirt if you need plain coloured sleeves work your design into the middle 4cms
Using word art print the name you want use the arc shape and then position it into the middle 4 cms of the shirt you can manipulate the size to suit, when you are happy with this add the number again using word art (remember to position this near the top of the shirt)
you can check what this will looks like with print preview
hope these instructions help
happy crafting

Footy shirt 2 Tutorial


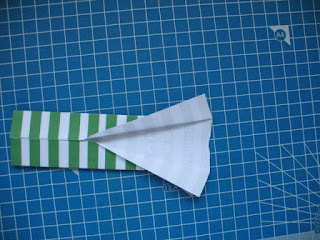
Fold out the two corners make sur you have done this at the top part of the shirt as these will become the sleeves.
Then fold in half when you turn the shirt over you can guage where you want the sleeves to start.
make a cut and fold it back behihind the shirt then tape it securely at the back
your footy shirt is now ready to be mounted onto your chosen card
happy crafting

Tuesday, 4 November 2008
Hellebore the Christmas Rose
Monday, 3 November 2008
Christams Branches
Subscribe to:
Posts (Atom)
Hi Crafty Friends, I'm finally back in cold Scotland and waiting for the warm weather to appear. I am now starting work on my dragon jo...
-
After designing the Engagement card I decided to have a play and came up with a lattice arch Gra file is here also an L shaped lattice Gra ...
-
I got some friendly Plastic from the SSEC and decided to let Cara and Connel My Grandchildren make a braclet for Mummy to go with the card t...
-
Paper nation Decoupage again I printed the greeting and then backed the image onto some Heart nesties cut with the Robo there are four layer...


.JPG)
.JPG)
.bmp)
.bmp)
.bmp)
.bmp)
.bmp)
.bmp)
.JPG)
.JPG)
.JPG)
.JPG)


.JPG)
.JPG)

.JPG)
.bmp)
.bmp)
.JPG)


.JPG)