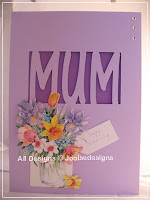
Another card designed using Design master and cut with Robby
I love Pansies and I found this pansy decoupage that is just right for the card I also added ribbon, glitter and gems
Thursday, 5 March 2009
Oval Lattice
Oval Lattice Mum I designed using design master and cut with Robo I added a little decoupage Bear paper flowers and a tag and some 3D nail paint
The file is here but please read the T&C before uploading and using
Mum in pink and green
Another version of the mum card this time I have used an embossing folder on the bottom of the card and added a ribbon.
I have a Mum Gra file with flowers please read my T&C
Mum
This card was cut using Robo and the decoupage was from one of the many Cds
I did not save the Mum wording but will add it to one of the Mother's Day cards that will appear on my Blog.
I dont normally make two cards the same but when it comes to Mother's Day and you have two mums I am asked if I can make the same card but in different colours
I did not save the Mum wording but will add it to one of the Mother's Day cards that will appear on my Blog.
I dont normally make two cards the same but when it comes to Mother's Day and you have two mums I am asked if I can make the same card but in different colours
Wednesday, 4 March 2009
Silver Wedding
Anniversary
Monday, 2 March 2009
Award
I have received this from 4 blogger friends Thankyou very much as Shell said when she received it I feel "all warm and fluffy inside"
I must now award this to my 10 favourite blogs but I have so many that I love looking at and draw inspiration from many blogs I visit
I will be back to award this and my previous one later
Thank you so much
I must now award this to my 10 favourite blogs but I have so many that I love looking at and draw inspiration from many blogs I visit
I will be back to award this and my previous one later
Thank you so much
Happy Birthday Mum
Another card made with the Mum Gra. File. this time I altered the cutting settings and cut the inlay and flowers from an 8 x 8 scrapbook paper.
I added a printed gtreeting in matching colours and finished with a ribbon and gems
Storm troopers
Friday, 27 February 2009
Award
I have received an award from Yvonne, I would just like to say a huge thanks for that.
There are the 6 rules;
1. The winner can put the logo on their blog.
2. Link the person you received your award from.
3. Nominate at least 5 other blogs.
4. Before listing the nominees give a brief reason why you chose them.
5. Put links of those blogs on yours.
6. Leave a message on the blogs you have nominated.
I will be back to add these later thanks
Mother's Day Lattice
Lattice L designed using Design Master and cut with Robo I used Jane Netley Cd from Joanna Sheen for the Fushia as this is the flower that was asked for the Gra file is Here
Thursday, 26 February 2009
Lattice Arch
Engagement
An Engagement card I designed the lattice and Initials in Design Master and cut with Robo
I then added Glitter, punched Hearts and Butterflies to the lattice and Die cut Funky Heats at the bottom of card with a banner greeting printed in Gold GRA File Here
Wednesday, 25 February 2009
Push me pull me card 1
1 You need piece of card 29.5 cm x 14cm
2 Measure and score the card width ways three times 9.5cm you will
be left with a lip do not cut this off. you need this tostick the folded card together so that the movable parts are free to slide
Using a bone folder crease each score line.
3 You will need another two pieces of card 14cm x 8.5 cm's
these will be the push and pull pieces
Decorate one side of both cards i,e Verse and topper or two verses
make sure they are flat to the cards
4 You will also need a piece of polythene 3 cm x 30 cm
I use a carrier bag
5 Wrap the polythene around the side end panel
of the folded card not the end with the lip
PLEASE GO TO PART 2
Push me Pull me Card 2
6 When you have your polythene in place and stuck with sellotape
you can fix the two pieces of card ( should be face up)to the polythene strip one sits at the back
and the other sits at the front
To stick use DS tape on the polythene and at opposite sides as per diagram
Add a ribbon to the card that pulls on the right
7 Fold the card and decorate the middle panel of the folded card
making sure it is the right way up
8 & 9 this is how your card should look
Tuesday, 24 February 2009
An Award
I have been given this award from
Val a lovely lady who has some fantastic cards on her blog
I must give this award to five people and it is so hard to choose but here goes
Maureen who is always stopping by to leave lovely comments on my blog and has some fabby cards on her own blog.
Michelle The midnight crafter and has a fabby blog that is full of beautiful innovative ideas.
Angela This lovely lady has lots of different crafts and makes a lot of it for charities some beautiful cards take a look.
Shell who always leaves lovely comments on my blog and has some fabby ideas on her own blog.
Angel who leaves lovely and encouraging comments on my blog she is such a lovely lady and also has her own fantastic blog.
There are a lot more of you who leave wonderful comments but the rules are five I'm sorry that I have had to leave anyone out
Design master Freebie
Heartfelt Sympathy
A few sympathy cards designed and cut with robo
I printed the greeting and added a ribbon If you would like the file it is Here
Parchment Butterflies
Subscribe to:
Posts (Atom)
Hi Crafty Friends, I'm finally back in cold Scotland and waiting for the warm weather to appear. I am now starting work on my dragon jo...
-
6 When you have your polythene in place and stuck with sellotape you can fix the two pieces of card ( should be face up )to the polythene st...
-
After designing the Engagement card I decided to have a play and came up with a lattice arch Gra file is here also an L shaped lattice Gra ...
-
I got some friendly Plastic from the SSEC and decided to let Cara and Connel My Grandchildren make a braclet for Mummy to go with the card t...